Monday, December 7, 2015

Christmas Party

My kids invited their friends over for an "Ugly Sweater" Christmas party. They had a good evening in the empty shop and the timing couldn't have been better. I got them to pitch in with cleaning and organizing the shop just in time for a lumber delivery this Wednesday.

Once that arrives, I'll get started on the Strongbacks, Frames and Stringers for both halves of the Starboard float in addition to the fabric table and rack.

I'll also be switching over to the "Floats" section of the blog for future updates.

That tree just looked so pathetic.


"Marie Krismas" taped to the door - Crazy kids...


Thursday, December 3, 2015

Pre-Filter material arrived

I received a large roll of Pre-Filter media from UPS yesterday and got it installed over my filters.
I also got the bathroom door hung and sealed with a clear coat of Poly. The wood grain was too nice to paint over.

This weekend, the kids are having a Christmas party in the shop with some of their friends. The timing worked out perfectly as the lumber for the strong backs, frames, work tables and fabric racks will be arriving next Wednesday.

I'll also be placing the Core-Cell foam order soon. It seems there is quite the demand for SAN foam materials, so it can take 5-8 weeks for an order to be filled. If that's the case, then the timing "should" work out really well.

Bathroom door hung and clear coated. I still need to build out a loft storage area for foam storage.

Still need to install the doorknob and some trim pieces

Filter box is now completed. Pre-filter media is installed


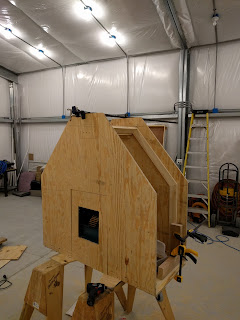
This exhaust hole will be used later on to attach a flexible hose to force some clean air into the hull for ventilation.

Shop - pretty much ready to start the building project.

Once the strong backs get built, it'll be a long time before we see this view again!


Tuesday, December 1, 2015

Punch List

Last night after work I spent a couple of hours cleaning up the shop and figuring out what else needs to be done before I can get started on the boat build.

The list is really getting short and that makes me happy!

 - Finish up the bathroom
 - Hook up the sink plumbing
 - Build a loft storage area for foam sheets (above the bathroom)
 - Finish up the shop air filter (just an electrical cord wrap and some paint should do it)
 - Build a rolling fabric rack
 - Build a couple of work tables

After that punch list gets done, I think I'm pretty much ready to order up the lumber for the strongbacks and the MDF for the hull forms.

If all goes according to plan, I don't see why I can't begin by middle January.
That would be great, since it would put me a solid three months ahead of schedule!

Which reminds me, I need to see about ordering up some foam sheets since I'm not sure how long that will take to arrive.


Monday, November 30, 2015

Portable Shop Air Filter

After the HVAC was completed, I turned my attention to the next two things on the list.
Getting the bathroom finished up and building a portable shop air filter.

One of the big issues I keep running across when working with composites is dust control. To this end I could have purchased a commercial air filtration unit, but thought it would be more interesting (and less expensive) to build my own with a blower motor I had from an old HVAC system.

Anyone knows that the secret to clean air is a good set of filters combined with enough surface area to allow for low velocity air movement through the filter itself. Since most home HVAC systems run for years with one filter I did some quick math (very scientific, I assure you) and decided four filters would do the trick. I also wanted the filter box to be mobile so I could position it near the working area. I wanted some outlets installed on it to help reduce some extension cord clutter and lastly, I wanted the ability to attach some sort of ducting to it to allow for positive ventilation inside the hulls when necessary. The blower capacity is calculated to cycle the shop air twice an hour.

I'm still working on it (and yes, I already spent too much time on it), but it was a fun exercise and seems to work well enough. I'll also be installing the same pre-filter material on this box, so that's why you will notice the filters are recessed a bit.

As for the bathroom, I got the urinal installed and pressure-checked. I also got the walls painted and the light installed. I should be able to get the door installed by this next weekend.

Urinal mounted to get correct pressure line length measurement


Framing up door way

Light installed with switch on wall

I did not screw down the last piece of plywood yet since I needed to check for leaks first

Mostly done here now - I still need to take care of some flooring, but that will come later.


Air Filter Box

Two sheets of plywood for filter box

Base plate for blower motor

The motor is installed on a sled to allow for easy removal and servicing

This is actually a three-speed blower, but I'll just be using one speed (Hi)


Cutting the basic shape and using thin lumber to keep it a bit lighter...

Casters installed

Top plate being built

Top plate in position on the rear wall

Side rails being built for filter support

Some temporary braces installed for supporting the rear wall


Rear wall in place. All pieces glued and screwed


Front face being modified to allow for motor removal


Motor pushed back into "In Use" position

Motor pulled forward for maintenance/removal

Front panel in place


Trial fit of filter (one of four)

Deflector board spacers

Deflector board and filters installed for test run


On/Off switch mounted near top and double outlet installed near bottom.
I was short one outlet - to be installed later

I still have a bit of work to do on this yet - I will cut some louvers into the deflector board at a 45 degree angle. I'll also leave a section of the board intact to allow for a 6" (150mm) flexible ducting installation later on.